Monday, January 31, 2011

Tuck-It Board Giveaway WINNER!

Remember this beautiful Tuck-It memo board, custom-made by Tracey?


Well, we have our lucky winner!


Congratulations, Erin!  Erin said:


I would definitely use one of the boards for my jewelry- I have way too much and it all needs a home!

Erin now has a fabulous place to hold all of her jewelry.  Erin, you're going to love this board!  I'll be contacting you so we can get your prize to you!

Please visit Tracey's Etsy shop, Art Recycles, for more of her fabulous Tuck-It Boards.  While you're there, check out her Tack-It Boards, too!


I could definitely use on of these in each room of the house.  In the kitchen for coupons, in the kids' rooms for drawings and photos, inside the pantry to hold keys....the possibilities are endless!


Thanks, Tracey, for the awesome giveaway!  :)

(DIY) Little Girls' Barrettes

Barrettes have long been Charlotte's "signature piece."  She's been blessed with thin, wispy hair (she must get that from her father!) so wearing a barrette is really the only way to keep it out of her eyes.


I thought it would be cute to make her preschool classmates barrettes as a Valentine's gift.  They are super easy to make yourself.

First, choose your ribbon!  I like to use grosgrain the best; I think it looks nicest.


You'll also need some sort of clip.  I got mine at Sally.  They were about $5.00 for 100 clips.

\

Next, cut the ribbon.  It should be about 4 times the length of the clip.


Begin gluing the ribbon down on the inside bottom of the clip.


Then, glue the ribbon around the rest of the clip.  Press hard as you go to form a tight seal.  When you get to the head of the clip, add some more glue and press the ribbon so it follows the line of the clip.


Stop looking at my chipped nail polish.  You looked, didn't you? :)

Finish gluing by continuing around the top of the clip.  You'll end on the inside, top part of the clip.

Next, choose your embellishments.

How easy is that?  


The last step is to admire them on a cutie-patootie model.


In my next post, I'll show you how I'm going to attach them to a Valentine.

Happy Monday, everyone!

Friday, January 28, 2011

(Freebies) Valentines Printables

There's just something about a homemade Valentine's Day card.

When I was in 6th grade, I had this sweet little boyfriend.  We used to pass notes and sit together on the bus, as 6th grade couples often do.  A few days before Valentine's Day, we decided we were going to exchange Valentines.  Actually, I think the conversation went more like this:

Boy:  It's almost Valentine's Day.
Me:  Yep, it is.
Boy:  Should I get you a card?
Me:  I don't know.
Boy:  Well, I'll get you a card if you get me one.
Me:  Ok.  Let's do that.

We had ourselves a deal. When Valentine's Day rolled around, I forgot about the deal....and remembered about 10 minutes before dismissal.  I knew I was going to see him on the bus ride home from school, so I grabbed a piece of that yellow newsprint handwriting paper and scribbed "Happy Valentine's Day" on it as fast as I could.  I got on the bus first, and he soon slid in the seat next to me.  I shyly handed him the yellow paper, chest puffing out with pride at the fact that I had remembered to make it.  I was SUCH a good girlfriend!  He proceeded to pull out the most beautiful, intricate, handmade Valentine I had ever seen.  (This is not the actual valentine, but it looked something like this):

source
It made me simultaneously feel happy and horrible...happy that he liked me enough to make something that detailed, and horrible that I hadn't taken the time to do the same.

It turns out that I dated this same boy again in college and, not surprisingly, he made me a homemade Valentine that year, too.  Absolutely adorable, and so very memorable.  And I'm sure I gave him a forgettable store-bought card...I was not in touch with my craftiness during those college years.

So, again:  There's just something about a homemade Valentine card.

I've rounded up a few of the very best free printable cards on the web for you.  Take the extra time to print and personalize them....you never know who might remember your thoughtfulness decades later!


How adorable are these?  Old School style.  You just print, and cut.  Download here.


74 Lime Lane Downloadable Cards.  
A little twist on the "Keep Calm and Carry On" mantra.  Super cute! Download here.


For your little superhero...Download here.


Twig and Thistle's DIY Brownie Bags.  
Oh my, this one's my favorite.  And it's easier than you think.  Download here.


MMM Craft's Wood You Valentine Card.  
Love the illustration on this one.  Download here.


I'll be sharing Charlotte, Gavin, and Nathan's homemade Valentines later in the next week.  Hopefully these will inspire you to create your own!

xoxoxoxo

Thursday, January 27, 2011

How I Spent My Snow Day

We had a snow day yesterday here in PA.  Since I was home from work, I figured I'd tackle a project that had been bugging me for a while.

We have a piece of furniture in our kitchen that used to house baking and cooking items.  When the kids were born, we started adding some art supplies to the mix.  Things got out-of-control pretty quickly.  And now, it looks like this:


I know.  I KNOW.  Something needed to be done.

On any other day, I probably would have gotten in the car and run to Ikea to get some storage baskets.  But we had over a foot of snow yesterday.  By mid-morning, my yard looked like this:


And that was just the beginning, so I had to improvise.  I gathered a few boxes that were ready for recycling, and cut the tops off.


Then I put masking tape around the edges so they were smooth...


And wrapped the box with some pretty wrapping paper.


And now, my cabinet looks like this:


Ahhhhhh.   That's better.

We're snowed in again today, so we'll see what else I can tackle.  In the meantime, I'm staring at this photo I have tucked in with the plates in our kitchen.  It was taken in sunny St. Thomas, long before kids, or toys, or coloring books.


C'mon, Spring!

Tuesday, January 25, 2011

Longing for Spring...

These images have me longing for Spring today.  Yesterday it was 9 degrees in southeastern PA!

I can't wait to start planning (and planting) my garden. We bought raised beds last year, and I'm eager to get my hands in the dirt.  I haven't been able to garden much in the past four years...having three children under the age of 4 makes it quite difficult to do anything productive while we're outside.  The kids tend to run towards the street!  This year, they seem to be a *teeny bit* more willing and able to play in the backyard while I get other things done.  I'm not sure I can get my garden to look like this photo anytime soon, but anything is better than nothing.
source

I recently visited Anthropologie.  While I love their housewares and clothing, I am always fascinated by their displays.  This time the store was decorated with big bowls and sacks of flour everywhere.  (I plan to go back and take photos....but I left my camera at a friend's house last weekend!  I'm itching to get it back...there are so many things I'd like to take photos of and share with you!)  

Anyway, I think I'd wear this Anthropologie dress all Spring long.
Rainbow Confetti Dress

While I'm parading around in my Rainbow Confetti Dress, feeling all Springy and fresh and light, Charlotte will be in tow wearing this one from Kayce Hughes.


Speaking of Kayce Hughes, have you checked out the sale on her website? You should.  My 3/4 sleeve tunic dress is my favorite dress ever, and I'm tempted to buy one for all of my friends now that it's on sale.  

I know I'm desperate for warm weather, because I'm longing to paint my nails this color.


And what about you?  Are you ready for Spring, or enjoying the cold weather?


Sunday, January 23, 2011

Charlotte's Dress-Up Area and Giveaway

*THIS GIVEAWAY IS NOW CLOSED*

For years before I was pregnant, I dreamed of having a little girl.  I imagined shopping for little smocked dresses, and painting her nails, and clipping pretty bows in her hair.  Be careful what you wish for.

Charlotte is the girliest girl I could ever imagine.  She refuses to wear anything but princess dresses.  She gets frustrated if her hair isn't styled correctly.  She spends hours talking on her "cell phone" and stuffing important items (dolls, granola bars) into her tiny handbag.  I love it, but having that kind of girlie-girl also comes with a lot of stuff.  She has so many barrettes, dresses, jewelry, and shoes that I wasn't sure at first how to keep it all organized.

I recently began creating an area in her room where she can keep all of her girlie things organized.  It isn't complete yet, but here's where we are so far.


She has a few hooks for her dresses and tutus, a mirror to admire herself, and -- my favorite feature -- a Tuck-It Board made for Charlotte by my friend Tracey.


Isn't it cute?  Tracey has an Etsy shop where she sells Tuck-It Boards and other creations.  I use mine to hold Charlotte's barrettes, and sometimes I slip a little note or photo in there too.


Tracey makes Tuck-It Boards for lots of uses.  They can hold photos in a boy's or girl's room, barrettes or jewelry in a girl's room, sweet notes and cards in a nursery, memos in an office, or bills or paperwork in the kitchen.  They would also make a terrific shower or birthday gift!  Here are some of my favorites:


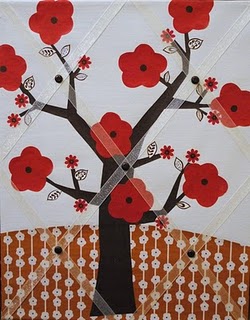
And here's the best news....Tracey has offered to give a Tuck-It Board to one lucky Tulip and Turnip reader!  Here's the one-of-a-kind creation:


And here's Tracey's description:

It's an 11X14 inch Tuck-it board called "Red Blossoms". The width ribbon is brown with green dots.

Keep all of your memorabilia safe by tucking it under the ribbon. Great for organizing or displaying all of your favorite photographs, movie/concert/sporting tickets, cards, notes etc. All boards are one-of-a-kind and hand made by Tracey J Dean.

Tuck-it boards are created on stretched canvas with high quality scrapbooking paper, ribbon and decorative brads. Width of canvas board is covered with ribbon to compliment the composition.

The Tuck-it board easily hangs on a wall; it's perfect for any room in the house.


You have five chances to enter.  Here's how:

1.  Leave a comment on this post.  Tell me how YOU would use the Tuck-It Board if you won.  Don't forget to leave an email so I can contact you!

2.  Become a follower of this blog.  Make sure you leave another comment telling me you did so (or telling me you are already a follower).

3.  Become a follower of Tracey's blog (click here).  Leave a comment telling me you did so (or telling me you are already a follower).

4.  Become a fan or Tulip and Turnip on Facebook.  Leave a comment telling me you did so (or telling me you are already a follower).

5.  Post this giveaway on your blog, Twitter, or Facebook status with a link.  Leave me a comment telling me you did so.

Giveaway open to US Residents only.  Winner will be chosen randomly on Monday, January 31 at 8:00 pm (EST).  Good luck!

Related Posts Plugin for WordPress, Blogger...