Sunday, August 28, 2011

New Work Station

Our house was built about nine years ago.  During the construction, we were so excited about having our own little plot of Earth --our first place--that we neglected to realize there was not a single storage space in our entire house, other than a teeny tiny hallway coat closet with the capacity to hold two coats.  Also, no mud room.  No place to store winter stuff (gloves, hats, scarves).  No place to hang coats.  No place to store towels.  No place to store sheets.   You get the idea.  At the risk of sounding offensive, I'll tell you this:  at least twice a day I curse the man who designed our house.  I'm certain if it was a woman I would have a linen closet, at the very least.

For several years, I've had this cabinet in my kitchen nook.  I've used to hold all of my baking pans as well as art supplies for the kids.


It served it's purpose well, but lately we've been having another problem.  We really have no "family center."  No place to store bills or sit down and pay them.  No place (other than the couch) to work on my laptop or grade papers. And I'm sure that in a few years I 'll need a place to store all of the kids' paperwork from school, and sports schedules.

For two years now, my laptop has been sitting on the kitchen counter next to the stove, so every time I cook spaghetti sauce, I wind up cleaning the splatters off the laptop.  I decided to move this big cabinet upstairs to hold towels and sheets, and create a little workstation here instead.

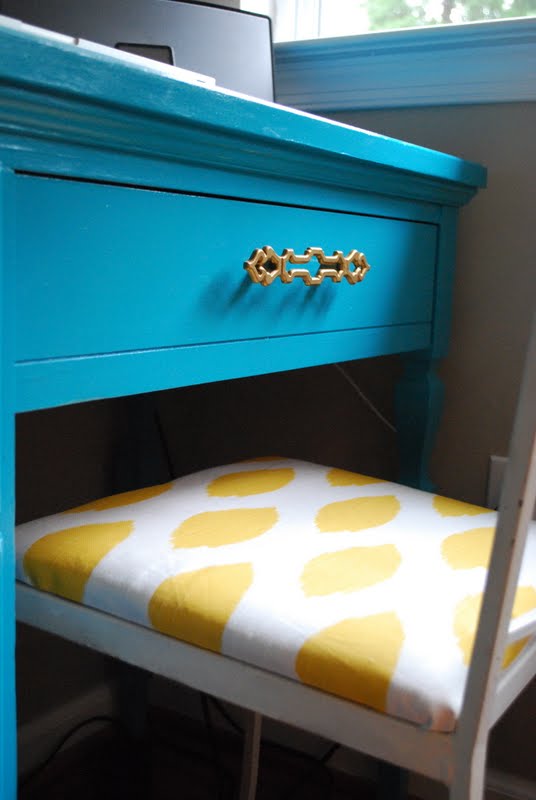
Remember this desk I picked up at the Habitat for Humanity ReStore?


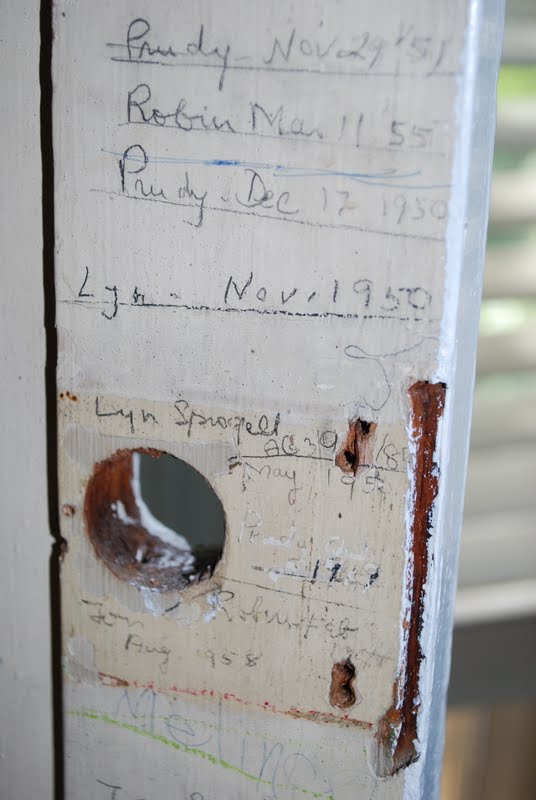
She was part of my plan, but she needed a bit of work.  First, I used some Goo Gone to get rid of all the tape on the front drawer.  Do you see it there?  I wonder what it's former owner was up to.  There were also some nicks in the wood, but they were easily fixed with some wood filler.  Then I just sanded the whole thing quickly...took about 10 minutes.  I added two coats of primer, and two coats of paint.  Here she is today!


I went big and bold with this one:  Peacock Feather by Behr.  I LOVE how it turned out.  Since the handles are what drew me to this desk in the first place, I wanted them to stand out.  So I used some Rub N Buff in Grecian Gold.  Here's how my little "office nook/control center" looks now:


I've had that little chair for a while, but never knew what to do with it.  It's a thrift store find, too.  I recovered the cushion with some leftover fabric from the ottoman.  Here's a shot of it before, in all it's french toile glory:


The Keep Calm print.  I know, I know.  They are EVERYWHERE.  I'm sure you're tired of them.  But seriously, that's my mantra. This one is from Pressureless on Etsy.  Isn't is gorgeous?  The frame is from IKEA.


Wanna see my FAVORITE thing about the desk?  It was already there when I bought it.  It's the paper that's lining the drawers.  I love it!


Wanna see my other favorite thing?  The photo I found in the drawer:


Look at those fabulous, fabulous girls.  I am certain that they would approve of their desk makeover. Don'tcha think?


Monday, August 22, 2011

Gallery Wall

For a long time, I've been trying to decide what to do with a big blank wall in our family room.  The only thing that was hanging on that wall was an enormous T.V.


Pinterest really came in handy, because I was able to find lots of photos for inspiration.  In the end, I decided to do a gallery wall of photographs and my childrens' artwork.  I kind of wanted the arrangement to be random, but Michael was adamant about it being symmetrical.  I let him win this one.  :)


Hmmm.  That white return vent up there sticks out like a sore thumb.  I'll be painting that the same color as the wall.  Soon.


This Happy Place print is one of my favorites.  I bought it on Etsy, here.  She has really beautiful artwork with positive messages.

I also love this watercolor, created by Charlotte:

Seriously, don't you think this would fetch hundreds of dollars in a gallery?  I love it.

And when I want to cover the TV entirely, I can still use the IKEA-canvas-trick that I stole learned from Maria at John's Journal.


The frames are really easy to take down and switch out.  I have a feeling I'm going to want something different after a while.  Like maybe botanical prints, or black and white photos.  We'll see!

I hope you enjoy your Monday!

Tuesday, August 16, 2011

Measuring Growth

I grew up in an old, beautiful farmhouse.  I loved it.  I felt like I discovered something new there everyday. My parents still live there, and we're still discovering!

One thing that my sisters and I were (and are) obsessed with is this small, skinny closet door in my parents' bedroom.  It opens to a small linen closet.  On the inside of the door are marks, dates, and names measuring growth.


Of course, I wonder who all of those people were.  There are SO many names.  Is it a mish-mash of lots of previous owners?  Or is it one extended family, who would line up there, maybe on Christmas when they gathered together?  A mystery.

I've always wanted to do something similar, but didn't want to mark up a door or wall in my house.  But then I figured, who cares?  Charlotte doesn't.

So I started last August, much to Michael's chagrin.  He likes things just so, and didn't appreciate that I did this to the pantry.  But he's grown to love it too, even though he'd never admit it.


They love to see how much they've grown, and so do I.  And now I'm off to clean my pantry door, now that I have evidence as to how dirty it is.

Sunday, August 14, 2011

Our Week, Instagram-Style

Happy Sunday!  I hope you all had a great week.  We had an EXCITING week here!  The biggest news:  we have a new cousin/niece, Molly Eileen!  Here's a snapshot of little Molly with her proud dad, Joe.


In slightly less exciting news, we are keeping a close eye on our watermelon crop.  


Also, the kids have invented a new game in which they are babies, and these are their cribs.  It's a super-fun game, let me tell you.  It involves a lot of laying around and quite a bit of fake crying (my favorite).


We have some much-needed rain in store for the next week, which makes for some fun times in our boots.  It kind of ruins the lawn.  Don't tell Michael.


I hope you had a fun week, too!

Linking Up Here:


Tuesday, August 9, 2011

My August Garden

Friends, the people running the internet have had it out for me lately.  I've spent an embarrassing amount of time sitting in front of a screen with a spinning wheel.  It's not my computer.  It's my Internet Service Provider.  They have to get their butts out to my house and figure something out.  I hope I can post as much as I'd like to.

So.

I tried my hand at a vegetable garden this year.  I figured I'd start small, particularly because my yard is teeming with animals and I was certain anything I planted would be eaten instantaneously.  Seriously.  We've got a zillion rabbits, groundhog, and even a fox.  Also, I didn't know what would grow well, so I didn't want to get in over my head.

Here it was when I started.  My friend picked up these raised bed kits for me at BJs.


We put wire around them in an attempt to keep the animals out.


And then I watered them every night, and kept my eye out for the bunnies.  Those suckers are everywhere.  This is what I saw from my house one day:

The photo is grainy; I snapped it quickly from inside my house with a telephoto lens.  It's a groundhog, on his haunches, staring into my garden.  That rascal.

Today, I'm proud to say, the plants are growing nicely. The "fence" worked well.


These are my little farmers.  They help a little, and goof around a lot.


Have you harvested anything lately?


Sunday, August 7, 2011

Our Week, Instagram-Style

This week, we had a trip to the library.  It's one of the kids' favorite things to do.  They love discussing the topics they are interested in that week (dinosaurs, trains, etc...) and searching for books in those categories.


We swam a bit in the kiddie pool.


Left unattended, Nathan decided to give Buzz Lightyear a makeover.


After being inspired by an episode of Bubble Guppies, the kids decided they wanted to start a "rock and roll band."  What, you didn't know the Bubble Guppies were hardcore?


The kids asked Michael to draw a picture of Mommy and Daddy.  This is what he drew.


You should have seen him trying to contain his laughter when the kids showed me.  Aside from my pointy hat and broomstick, check out the muscles he drew on himself.  I think that's even funnier.

And Gavin continues to amaze us with his choice of outfits.  He disappears at least twice every day and comes back downstairs, um...... accessorized


Let me break this down for you, so you understand just what you're looking at.  That's underwear on his head and around his ankles, socks on his hands, a shirt around his thighs, and a blue tongue from an ice pop.  This leaves Michael and I shaking our heads in disbelief on a daily basis.

Hope you had a great week too!


Friday, August 5, 2011

DIY: Upholstered Ottoman/Coffee Table

Well hello there, and happy Friday!  Today I'm going to share a project with you that has been a loooong time in the making.

I haven't had any sort of a coffee table in our family room for several years now.  This is mainly because my children have inherited my clutziness (word?) and manage to beat themselves up on anything with corners.  It's not really that I'm clumsy, it's just that furniture and other items tend to jump out in front of me.  Two weeks ago, I was attacked by a Cheerios box, and still have the giant bruise on my thigh to prove it.  Truly.

Anyway, I decided it was high time for a coffee table, but decided an upholstered one would be best due to our propensity for bumping into things.

I really had my eye on this one from West Elm, but I didn't love that it's $600:


So.  I hit the local Habitat for Humanity ReStore and found a coffee table for $25. (I'm a terrible blogger because I didn't take a proper "before" photo.  Here's what the legs looked like before.  They were a glossy green:


Here was the top before.  I don't know how to describe the color.  Muddy coffee?  And a bad paint job.  You can see I've already painted the legs here:


So.  I started by spray-painting the legs a glossy brown. (Well, actually I didn't START there.  I started by trying to strip the paint off the legs.  It ended badly.)  It took two coats of brown paint, and then I spray-painted a coat of glossy enamel over it.

Then, using spray-adhesive, I added 2-inch foam to the top of the table, as well as around the apron:


Then, I covered the whole thing in batting:


And stapled my fabric around it.  I've never upholstered before, so this tutorial was super-helpful.  The corners were the hardest part.  I wound up doing hospital-corners.


It's DEFINITELY not perfect.  I have to beef up the batting in some spots.  I'm also planning on going back and trying to rework the corners.  (Also, I CANNOT get a photo with a clean house.  That's just reality, folks.  There are also always going to be toys on the floor.  And there are always semi-dressed kids in the background.  Cuz that's how I roll.)

But, for now, it works!  What do you think?

Linking Up Here:


HouseofHepworths

The Shabby Nest


A Little Knick Knack


Related Posts Plugin for WordPress, Blogger...